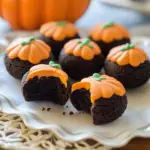
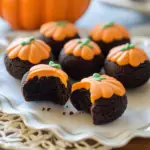
Pumpkin Oreo Balls are festive, no-bake Halloween treats that combine the irresistible flavor of Oreos with a creamy center and a spooky pumpkin-inspired design. Perfect for parties or a fun family project, these little bites are as delicious as they are adorable.
Why You’ll Love This Recipe
- Easy to Make: Requires minimal ingredients and no baking.
- Kid-Friendly: A fun activity for kids to help with shaping and decorating.
- Perfect for Parties: Festive and bite-sized, making them ideal for Halloween gatherings.
- Customizable: Swap out decorations to fit any theme or holiday.
Ingredients
(Tip: You can find the complete list of ingredients and their measurements in the recipe card below.)
- 36 Oreo cookies
- 8 oz cream cheese, softened
- 12 oz orange candy melts
- Small pretzel sticks (for pumpkin stems)
- Green icing or candy decorations (for leaves)
Directions
Step 1: Prepare the Oreo Mixture
- Place the Oreo cookies in a food processor and pulse until finely crumbled.
- Add the softened cream cheese and mix until the ingredients are well combined, forming a thick, sticky dough.
Step 2: Shape the Pumpkin Balls
- Using a cookie scoop or your hands, roll the Oreo mixture into 1-inch balls.
- Place the balls on a parchment-lined baking sheet. Refrigerate for 15 minutes to firm up.
- Use a toothpick to gently score lines into the Oreo balls to resemble pumpkins. Return to the refrigerator for another 10 minutes.
Step 3: Melt the Candy Coating
- Melt the orange candy melts using a double boiler or microwave. If microwaving, heat in 30-second intervals, stirring in between, until smooth.
Step 4: Coat the Pumpkin Balls
- Dip each Oreo ball into the melted orange candy coating, ensuring it’s fully covered.
- Gently shake off excess coating and place the ball back onto the parchment-lined baking sheet.
Step 5: Add Decorations
- While the coating is still wet, insert a small pretzel stick into the top of each ball to resemble a pumpkin stem.
- Add a small green icing decoration or candy leaf next to the pretzel for the leaf detail.
Step 6: Chill and Serve
- Refrigerate the decorated pumpkin Oreo balls until the candy coating is fully set, about 15 minutes.
- Serve chilled or at room temperature.
Servings and Timing
- Servings: 24 pumpkin Oreo balls
- Prep Time: 30 minutes
- Chilling Time: 15 minutes
- Total Time: 45 minutes
Variations
- Colorful Designs: Use different candy melt colors for a variety of themes.
- Flavor Twists: Try using flavored Oreos, such as golden or mint, for a unique twist.
- Nut-Free Option: Replace pretzel sticks with chocolate chips for stems.
Storage
- Refrigerator: Store in an airtight container for up to 1 week.
- Freezer: Freeze for up to 3 months. Thaw in the refrigerator before serving.
FAQs
1. Can I make these ahead of time?
Yes, they can be prepared up to 2 days in advance and stored in the refrigerator.
2. What if I don’t have a food processor?
You can crush the Oreos in a zip-top bag using a rolling pin until finely crumbled.
3. How do I prevent the candy coating from clumping?
Ensure the candy melts are heated gradually and stir in 1 teaspoon of vegetable oil if the coating is too thick.
4. Can I skip the candy melts?
Yes, you can use white chocolate and add food coloring for the coating.
5. Can I use homemade cream cheese frosting?
Store-bought cream cheese is recommended for the right consistency, but homemade can work if thick enough.
6. How do I make them more stable at room temperature?
Use candy melts instead of regular chocolate for a firmer coating.
7. Can I use different shapes?
Yes! Get creative with molds or shape them into bats, ghosts, or other festive designs.
8. Are these gluten-free?
Use gluten-free Oreos to make the recipe suitable for gluten-free diets.
9. Can I add food coloring to the candy melts?
It’s best to use candy coloring, as regular food coloring can cause the candy to seize.
10. How do I keep my hands clean while shaping?
Lightly coat your hands with cooking spray or wear disposable gloves.
Conclusion
Pumpkin Oreo Balls are the perfect combination of festive fun and irresistible flavor. With their creamy centers, crunchy coating, and adorable design, these no-bake treats are sure to be a hit at your next Halloween party. Easy to make and endlessly customizable, they’re the ultimate holiday dessert!
Print
Pumpkin Oreo Balls
- Prep Time: 30min
- Cook Time: 10min
- Total Time: 45min
- Yield: 24 servings 1x
- Category: Dessert
- Method: No-Bake
- Cuisine: American
Description
Make these easy Pumpkin Oreo Balls for a fun and festive Halloween treat! Perfect for parties or as a deliciously spooky snack.
Ingredients
- 36 Oreo cookies
- 8 oz cream cheese, softened
- 12 oz orange candy melts
- Small pretzel sticks (for pumpkin stems)
- Green icing decorations (optional, for leaves)
Instructions
1. Prepare the Oreo Mixture
- Add Oreo cookies to a food processor and pulse until finely crumbled.
- Transfer to a mixing bowl and combine with softened cream cheese, mixing until fully combined.
2. Shape the Balls
- Scoop the mixture into 1-inch balls and place on a parchment-lined baking sheet.
- Refrigerate for 15 minutes to firm up.
3. Add Pumpkin Details
- Use a toothpick to lightly score pumpkin lines around the balls.
- Return to the refrigerator for an additional 10 minutes.
4. Melt the Candy Coating
- Melt orange candy melts in a microwave-safe bowl or over a double boiler, following the package instructions.
5. Coat the Oreo Balls
- Dip each pumpkin ball into the melted candy coating, ensuring it’s fully covered.
- Gently tap off excess coating and place the ball back on the baking sheet.
6. Decorate
- While the coating is still wet, insert a small pretzel stick as the pumpkin stem.
- Add a green icing decoration or frosting as a leaf (optional).
7. Chill and Serve
- Refrigerate the pumpkin Oreo balls until the coating is completely set.
- Serve chilled for the best texture and flavor.
Notes
- Storage: Store in an airtight container in the refrigerator for up to 5 days.
- Decoration Alternatives: Use green candy melts or edible green glitter for leaves if icing decorations aren’t available.
- Pro Tip: Work in small batches when coating the balls to ensure the candy melt doesn’t harden prematurely.


Your email address will not be published. Required fields are marked *